


 AUDJPY Relief Rally: A Golden Opportunity for the Bears?
  FxWirePro: AUD/USD remains buoyant, looks to extend gains
  FxWirePro- Major Crypto levels and bias summary
  FxWirePro: AUD/USD soften slightly but trend is still bullish
  FxWirePro: GBP/USD eases slightly as investors focus on UK elections
  FxWirePro: USD/CAD gains some momentum as weak Canadian jobs data weighs on loonie
  FxWirePro: NZD/USD loses momentum but bullish setup remains
  GBPJPY Technical Check: Is the Dragon Running Out of Fire?
  FxWirePro= Major European Indices
  Aussie Strength Prevails: AUD/JPY Targets Multi-Year Highs as Bullish Momentum Builds
  FxWirePro- Major Pair levels and bias summary
  FxWirePro: USD/ZAR slips as rand gains on U.S.-Iran peace deal hopes
  Bitcoin Targets USD 90,000: Bullish Sentiment Solidifies as Realized Profits Surge
  FxWirePro: GBP/AUD edged higher but bearish outlook remains
  CADJPY Outlook: Loonie Limps as Dismal Jobs Data Fuels BoC Rate Cut Bets
  FxWirePro: EUR/AUD momentum strongly bearish despite pause in losses
  FxWirePro: GBP/NZD down trend loses steam, remains on bearish path


The RBA's 3.0% growth projections for 2016 have been the key drivers for the policy outlook; while developments in the terms of trade and the exchange rate will bear careful watching in the early part of 2016.
The Q3 national accounts put a slightly better spin on the economy than had generally been anticipated. That validated the RBA's on hold stance in the H2 of 2015 and should remove any last vestiges of hope that rates would be lowered in February.
Traders tend to view the put ratio back spread as a bear strategy, because it employs puts. However, it is actually a volatility strategy.
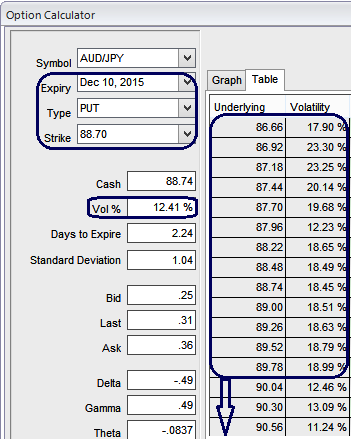
The implied volatility of 3D ATM put contract is at 12.41% and it is quite higher side which is good sign for option writers.
Based on volatility and time decay, the strategy is a "price neutral" approach to options, and one that makes a lot of sense.
As the options with a higher IV cost more, intuitively due to the higher likelihood of the market 'swinging' in your favor.
As we expect the underlying currency exchange rate of AUDJPY to make a larger move on the downside. As shown in the figure purchase 3 lots of 1W At-The-Money -0.52 delta puts and simultaneously short 3D 2 lots of (1%) In-The-Money put option with positive theta.
Entering into OTM AUDJPY position which has higher implied volatility and expecting for the inevitable adjustment is a smart approach, expecting the southward direction price movement.
You can trade the IV value by monitoring an IV chart for a specific underlying market for a certain time period and determine the IV range.
The peaks suggest the option is expensive to buy and the troughs suggest the option is inexpensive.
It is important to note you cannot compare the IV values of different options.

- News

- Economy

- Central Banks
- Investing
- Research
- Roundups
- Digital Currency
- Insights
- Technical Analysis
- Technology
- Business
- Law
- Health
- Nature
- Fintech
- Science
- Topic
- Opinions
- ©Econometrics LLC . All Rights Reserved.
FxWirePro: AUD/JPY 3D ATM IV favors put writers – 3:2 PRBS portrays to mine max leverage
Tuesday, December 8, 2015 9:26 AM UTC
Editor's Picks


- Market Data
Most Popular


