FxWirePro: GBP/AUD struggle to extend its recovery, good to sell on rally
  Fade the Rally: EUR/JPY Short Opportunity Near 180.80
  AUDJPY Tumbles Below 111 on Widespread Australian Dollar Weakness; Key Resistance at 112 Holds Firm
  FxWirePro: NZD/USD remains soft as US bond bloodbath dominates
  FxWirePro: USD/CAD hits two month high as Canadian as retail sales post monthly decline
  FxWirePro: EUR/AUD retreat from early gains, eyes another drop
  FxWirePro: USD/ZAR cedes early gains ,outlook bearish
  FxWirePro- Major Crypto levels and bias summary
  FxWirePro: GBP/NZD steadies around 2.3350 , retains bid tone
  NZDJPY Plunges Below 90 Amidst Broad New Zealand Dollar Weakness; Resistance at 90.80 Key for Downside Continuation
  FxWirePro: AUD/USD pressured by rising treasury yields, risk-off mood
  FxWirePro: GBP/USD gains some ground but bulls lack punch
  FxWirePro: USD/CAD extends advance as falling oil prices pressures commodity-linked loonie
  USD/CHF Bulls Eye 0.8400 Breakout as Broad Dollar Demand Drives 100-Pip Surge
  GBP/JPY Pullback Deepens: Sell-on-Rallies Strategy Targets 207.00 Support


 Add as a preferred source on Google
Overall trend of this pair fixes it bearish view for a target of 160.207 and may even tumble up to 156.480 in near terms.
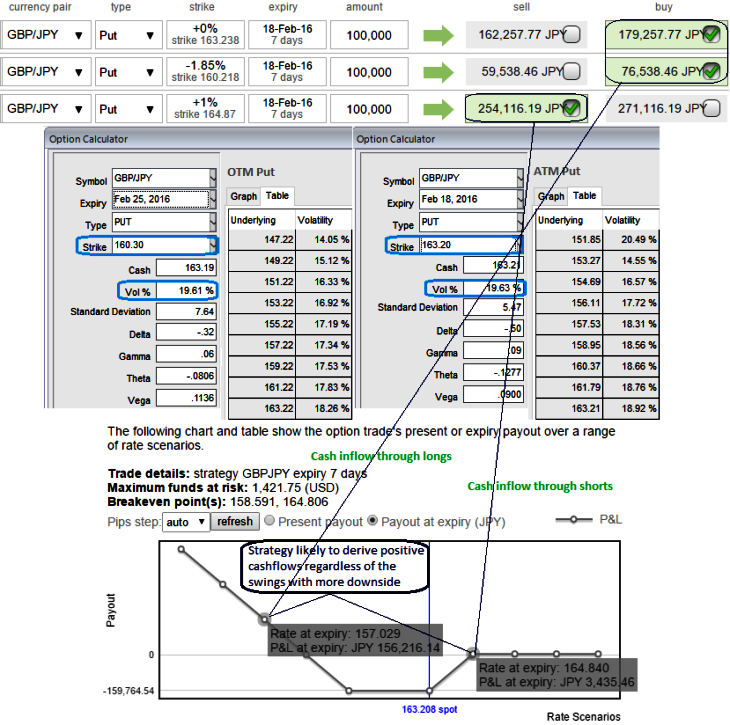
We can ponder arresting this potential downside risks through Put Ratio back Spread in 2:1 proportion and is more effective hedging strategy than any other means when one could sense more bearish momentum.
Subsequently, cause of concern in framing position would be which strikes need to be chosen so as to accurately hedging these downside risks. It's best to plug a back spread into the analyzer before doing the trade to see how the spread reacts to changes in the underlying price, time, and volatility.
Since the pair pops up bearish patterns and have more downside potential, a lot of (1.85% strikes at 160.207) OTM puts are justifiable . And preferred to deploy ATM instruments in the strategy for some considerable reasons,
because ATM instruments may be more expensive than OTM options, but cheaper than ITM options. They carry the highest gamma, vega, and theta which means their premium is the most sensitive to moves in either direction. Moreover, the delta of ATM options are 50%, which means there is an even likelihood of expiring ITM or OTM.
Some intermediate uptrend is seen so far, the bearish turn to resume here onwards, long put instruments to generate positive cash flows as a result.
So, stay firm with longs in at the money -0.51 delta put and out of the money -0.31 delta put that would function effectively. While simultaneously, short 1 lot of ITM put option would generate assured returns on any abrupt rallies, shortly longs on ATM puts are about to function that would take care of potential downswings.
Alternatively, if they wish to short OTM instruments, they sell puts that has delta of less than 0.15. Which means they sell deep out of the money options. The idea behind this trade is that the chance of this option to expire worthless is 85%. (1-0.15 = 0.85 or 85%).
The delta of a back spread or ratio spread is generally dominated by the option with the greater quantity the further it is from expiration. That makes sense, because the more days to expiration, the deltas of options are not as close to 0.0 or 1.00 as they are when there are fewer days to expiration.
Please be noted that the expiries used in the diagram are only for demonstration purpose, use shorter expiries on short side (preferably 4D or 1W maturities).

- News

- Economy

- Central Banks
- Investing
- Research
- Roundups
- Digital Currency
- Insights
- Technical Analysis
- Technology
- Business
- Law
- Health
- Nature
- Fintech
- Science
- Topic
- Opinions
- ©Econometrics LLC . All Rights Reserved.
FxWirePro: Use ATM and OTM puts in GBP/JPY 2:1 PRBS - ATM delta put ensures underlying outrights
Thursday, February 11, 2016 7:06 AM UTC
Editor's Picks



- Market Data
Most Popular