AUDJPY Tumbles Below 111 on Widespread Australian Dollar Weakness; Key Resistance at 112 Holds Firm
  FxWirePro: USD/CAD extends advance as falling oil prices pressures commodity-linked loonie
  FxWirePro: GBP/NZD steadies around 2.3350 , retains bid tone
  FxWirePro- Major Crypto levels and bias summary
  FxWirePro: USD/JPY loses momentum but outlook is bullish
  FxWirePro- Woodies Pivot(Majors)
  FxWirePro: USD/ZAR cedes early gains ,outlook bearish
  FxWirePro- Major Pair levels and bias summary
  ETHUSD Surges Past $2700 on Strong Institutional Demand, Technicals Show Bullish Crossover Despite Cooling ETF Inflow Momentum
  FxWirePro: GBP/AUD struggle to extend its recovery, good to sell on rally
  FxWirePro- Major Pair levels and bias summary
  FxWirePro: USD/CAD hits two month high as Canadian as retail sales post monthly decline
  Fade the Rally: EUR/JPY Short Opportunity Near 180.80
  USD/CHF Bulls Eye 0.8400 Breakout as Broad Dollar Demand Drives 100-Pip Surge
  Major Pair Currency Score: USDCAD and USDCHF Lead Bullish Momentum, While NZDUSD and AUDUSD Face Extreme Bearish Pressure
  Extremely Bearish JPY Majors: GBPJPY, NZDJPY, AUDJPY Lead the Decline
  FxWirePro: EUR/AUD firms slightly, but outlook remains bearish


 on higher IVs - EconoTimes)


 Add as a preferred source on Google
Technical glimpse:
We reckon this pair has shown weakness in recent past, bulls seemed to have been completely given up the previous rallies even though some left over price bounces can be extended in near term (see technical chart for bulls struggle).
After the ruthless slumps form the peaks of 2.2372, the pair has broken a support at 2.0152, it is on the verge of next medium term support at 1.9747 and at 1.9313 levels which 38.2% retracements during Q2 as sterling worsening and losing its strength against Aussie dollar.
To substantiate these reversal stances, some sort of bearish patterns and leading oscillators are also converging downwards with current falling price fluctuations; you can figure this out from monthly chart in our earlier post.
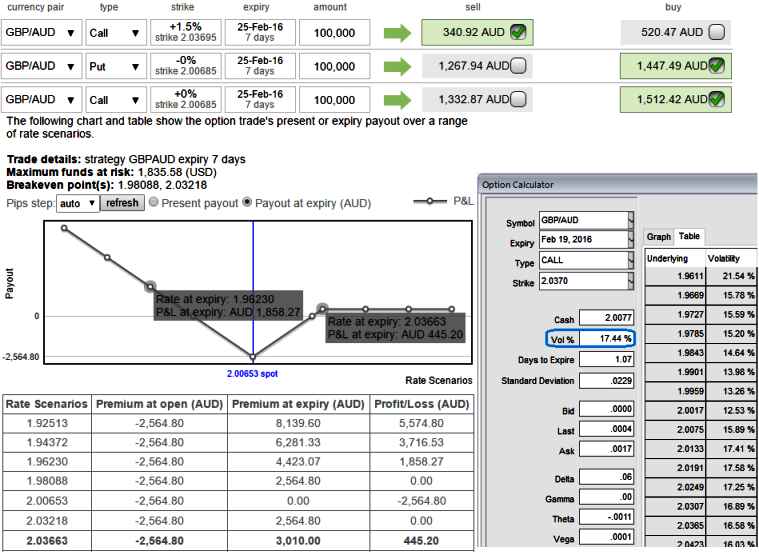
Hedging Framework: Buy 3-way: Straddle versus Call (GBPAUD)
As shown in the diagram, IVs for GBPAUD ATM option contracts are flashing at 17.44% for 1 week expiries. We would like you to know that options with a higher IV cost more. This is intuitive due to the higher likelihood of the market 'swinging' in your favour. If IV increases and you are holding an option, this is good.
Spread ratio: (Long 1: Long 1: Short 1)
Construction:
Long 1M at the money +0.51 delta call option
Long 1M at the money strike -0.49 delta put option
Short 2W (1.5%) out of the money (strikes 2.0371) call option with preferably positive theta.
Since ATM implied volatility is flashing more than 16% which is on higher side, since the straddle component consists of buying an ATM put and buying an ATM call of the FX pair with same expiration, probabilities of expiring in the money are very high.
The contrasting (versus) component is to sell an OTM call of the same FX pair but with a shorter expiration which would reduce the cost of hedging, this is because of the trend moving southwards and even if it evidences abrupt swings adversely chances of expiring in the money is quite low as the downtrend is on and we've chosen out of the money instrument with shorter expiry.
Please be alert that the expiries used in the above diagram are only for demonstration purpose, use right tenor for while execcuting the strategy.

- News

- Economy

- Central Banks
- Investing
- Research
- Roundups
- Digital Currency
- Insights
- Technical Analysis
- Technology
- Business
- Law
- Health
- Nature
- Fintech
- Science
- Topic
- Opinions
- ©Econometrics LLC . All Rights Reserved.
FxWirePro: Hedge GBP/AUD FX risks via 3way options straddle versus Call (3C) on higher IVs
Thursday, February 18, 2016 1:20 PM UTC
Editor's Picks



- Market Data
Most Popular