FxWirePro: USD/ZAR cedes early gains ,outlook bearish
  FxWirePro: USD/CAD hits two month high as Canadian as retail sales post monthly decline
  USD/CHF Bulls Eye 0.8400 Breakout as Broad Dollar Demand Drives 100-Pip Surge
  FxWirePro- Major Pair levels and bias summary
  FxWirePro- Major Crypto levels and bias summary
  FxWirePro: AUD/USD pressured by rising treasury yields, risk-off mood
  FxWirePro- Woodies Pivot(Majors)
  AUDJPY Tumbles Below 111 on Widespread Australian Dollar Weakness; Key Resistance at 112 Holds Firm
  FxWirePro: GBP/NZD steadies around 2.3350 , retains bid tone
  Sell the Rally: Gold Eyeing $4,000 as Dollar Strength Takes Control
  NZDJPY Plunges Below 90 Amidst Broad New Zealand Dollar Weakness; Resistance at 90.80 Key for Downside Continuation
  FxWirePro: GBP/AUD struggle to extend its recovery, good to sell on rally
  GBP/JPY Pullback Deepens: Sell-on-Rallies Strategy Targets 207.00 Support
  FxWirePro: USD/JPY loses momentum but outlook is bullish
  FxWirePro: GBP/USD gains some ground but bulls lack punch


 Add as a preferred source on Google
What's cooking with AUDJPY fundamentals: Japan reported +0.3% a sharp jump from previous -0.2%, while the BoJ remains to pursue the most aggressive easing policy among the major central banks, but it is arguably not getting enough 'bang for its buck'.
We review the strategy and tactics around Kuroda's QQME regime and draw out the salient contrasts with the alternative approach adopted by the ECB.
On the flip side, the RBA is not yet out of the woods. In particular, as long as China is struggling, a further rate cut is possible.
Technical Glimpse:
This APAC pair kept losing strong supports at 89.90 and 89.25 regions, as a result, you can figure out that the current prices have slid below 10DMA curve which served as the strong demand zones for this pair couple of times in the past as well.
Thus, we reckon any breach below base trend line of the falling wedge would determine the direction of next downtrend but certainly bias towards southwards for short term targets at 88.30 levels. Upon breach of baseline would set up next medium term targets T1 at 86.151, T2 at 85.787 and T3 at 83.375.
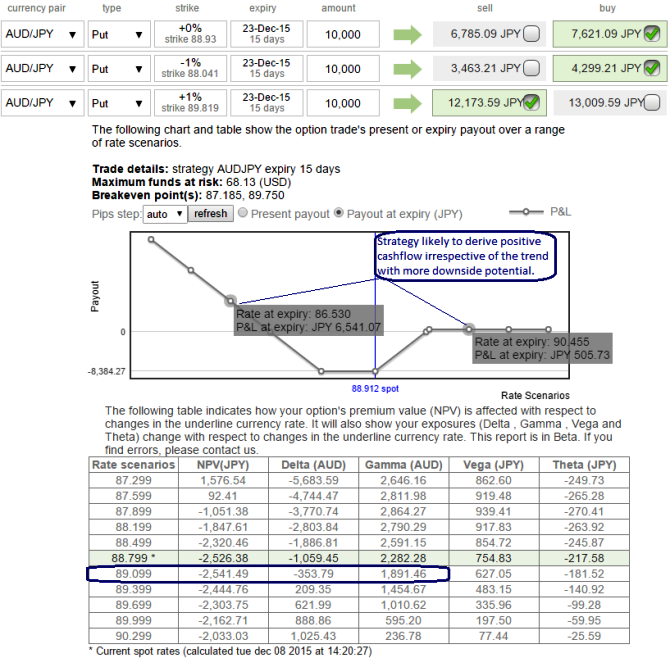
Hedging Formulation (Put Ratio Back Spread): AUD/JPY
So far we all know that the position uses long and short puts in the ratio, such as 2:1 or 3:2 and so on to maximize returns depending upon risk appetite and returns expectations. In most long/short spreads, you make money if the underlying price moves, but you lose if it remains in the middle loss zone. Now with increased volatility option shorter can get benefitted from this.
As we anticipate the underlying currency exchange rate of AUDJPY to make a larger move on the downside. As shown in the figure purchase 15D 1 lot of At The Money -0.51 delta puts, 1M 1 lot of (1%) out of the money -0.22 delta put and sell 1W one lot of (1%) In The Money put option with positive theta.
A ratio put back spread is different because it creates a net credit of JPY 253.29 as you can observe in the diagrammatic representation, so even if the underlying price does not move very much, you keep the credit if all of the puts expire worthless.
We think that the strategy is available in throwaway pricing while delta close to zero which one needs to bear this risk appetite.

- News

- Economy

- Central Banks
- Investing
- Research
- Roundups
- Digital Currency
- Insights
- Technical Analysis
- Technology
- Business
- Law
- Health
- Nature
- Fintech
- Science
- Topic
- Opinions
- ©Econometrics LLC . All Rights Reserved.
FxWirePro: Execution of AUD/JPY PRBS with net credit and reasonable risk reward profile
Tuesday, December 8, 2015 9:38 AM UTC
Editor's Picks



- Market Data
Most Popular