ETHUSD Surges Past $2700 on Strong Institutional Demand, Technicals Show Bullish Crossover Despite Cooling ETF Inflow Momentum
  FxWirePro: USD/ZAR cedes early gains ,outlook bearish
  FxWirePro: GBP/AUD struggle to extend its recovery, good to sell on rally
  FxWirePro- Major Crypto levels and bias summary
  Fade the Rally: EUR/JPY Short Opportunity Near 180.80
  NZDJPY Plunges Below 90 Amidst Broad New Zealand Dollar Weakness; Resistance at 90.80 Key for Downside Continuation
  Extremely Bearish JPY Majors: GBPJPY, NZDJPY, AUDJPY Lead the Decline
  FxWirePro- Major Crypto levels and bias summary
  FxWirePro: EUR/AUD firms slightly, but outlook remains bearish
  FxWirePro- Woodies Pivot(Majors)
  FxWirePro: NZD/USD remains soft as US bond bloodbath dominates
  FxWirePro: EUR/AUD retreat from early gains, eyes another drop
  FxWirePro- Major Pair levels and bias summary
  FxWirePro: GBP/AUD firms slightly, but downward resumption looks likely
  FxWirePro: GBP/NZD steadies around 2.3350 , retains bid tone
  FxWirePro: GBP/USD gains some ground but bulls lack punch


 Add as a preferred source on Google
As we expect the RBA to remain on hold for some time, but the RBNZ to ease again in March and June. Expected RBA vs RBNZ direction, plus strong M&A flow into the AUD, favours AUD/NZD upside over the next few months to beyond 1.10.
Please be informed that in our previous write up the strips were made unloaded on 8th Feb. Refer to this article.
After going through the above article, we hope you were convinced as to why we've suggested to unload the weights in strip strategy if you compare the prevailing upswings of AUDNZD with the current price is at 1.0791. However, those who altered the strategy into debit put spread so as to suit the leftover bearish swings that would have hedged the dips upto the bottoms at 1.0570, rest is history.
But for now, the pair has pretty much responded as per earlier analysis and we could now foresee some more price bounces in near term as the daily technical chart suggests some sort of buying interest that would result in considerable price recoveries but we maintain our 1st target at 1.0905 levels towards north, upon breach of this level where it would likely to test resistance, 1.10 is also quite probable event.
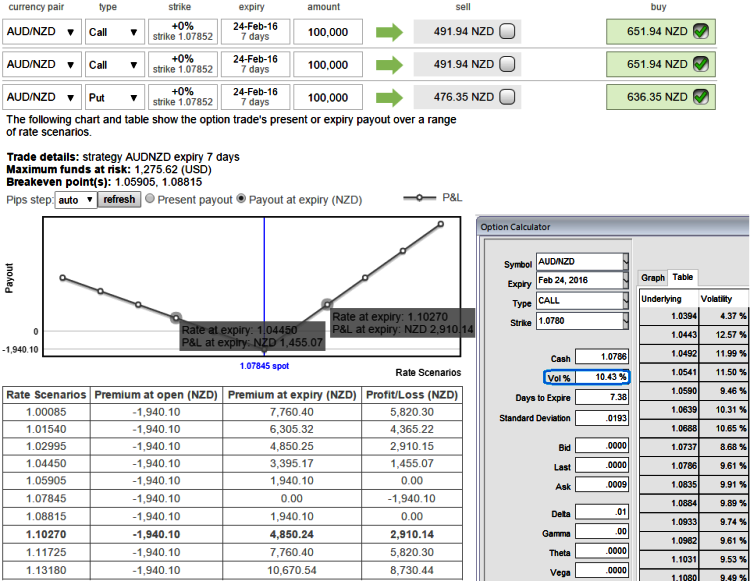
Thus, both on hedging and speculative grounds we recommend building portfolio with longs positions in 1w ATM 0.50 delta calls, 2W (1%) OTM 0.31 delta call and 1 lot of 4D -0.49 delta ATM puts. (For demonstrated purpose only we've used identical expiries in the diagram).
Hence, this AUDNZD option straps strategy should take care of any abrupt downswings in short term and certain upswings and yields handsome returns in long term. Delta of far OTM options is very small which is why we've chosen ATM instrument on call. A 1-point movement in underling pair will not have much effect on the option premium.

- News

- Economy

- Central Banks
- Investing
- Research
- Roundups
- Digital Currency
- Insights
- Technical Analysis
- Technology
- Business
- Law
- Health
- Nature
- Fintech
- Science
- Topic
- Opinions
- ©Econometrics LLC . All Rights Reserved.
FxWirePro: Deploy diagonal straps to keep AUD/NZD's puzzling swings on check
Wednesday, February 17, 2016 5:56 AM UTC
Editor's Picks



- Market Data
Most Popular