FxWirePro: USD/CAD extends advance as falling oil prices pressures commodity-linked loonie
  ETHUSD Surges Past $2700 on Strong Institutional Demand, Technicals Show Bullish Crossover Despite Cooling ETF Inflow Momentum
  FxWirePro: GBP/NZD sustains gains as uptrend remains strong
  NZDJPY Plunges Below 90 Amidst Broad New Zealand Dollar Weakness; Resistance at 90.80 Key for Downside Continuation
  GBP/JPY Pullback Deepens: Sell-on-Rallies Strategy Targets 207.00 Support
  Major Pair Currency Score: USDCAD and USDCHF Lead Bullish Momentum, While NZDUSD and AUDUSD Face Extreme Bearish Pressure
  FxWirePro: AUD/USD pressured by rising treasury yields, risk-off mood
  AUDJPY Tumbles Below 111 on Widespread Australian Dollar Weakness; Key Resistance at 112 Holds Firm
  FxWirePro: GBP/AUD firms slightly, but downward resumption looks likely
  FxWirePro- Major Crypto levels and bias summary
  FxWirePro- Major Pair levels and bias summary
  FxWirePro: USD/ZAR cedes early gains ,outlook bearish
  FxWirePro- Major Pair levels and bias summary
  FxWirePro: EUR/AUD retreat from early gains, eyes another drop
  FxWirePro: GBP/AUD struggle to extend its recovery, good to sell on rally
  USD/CHF Bulls Eye 0.8400 Breakout as Broad Dollar Demand Drives 100-Pip Surge


 Add as a preferred source on Google
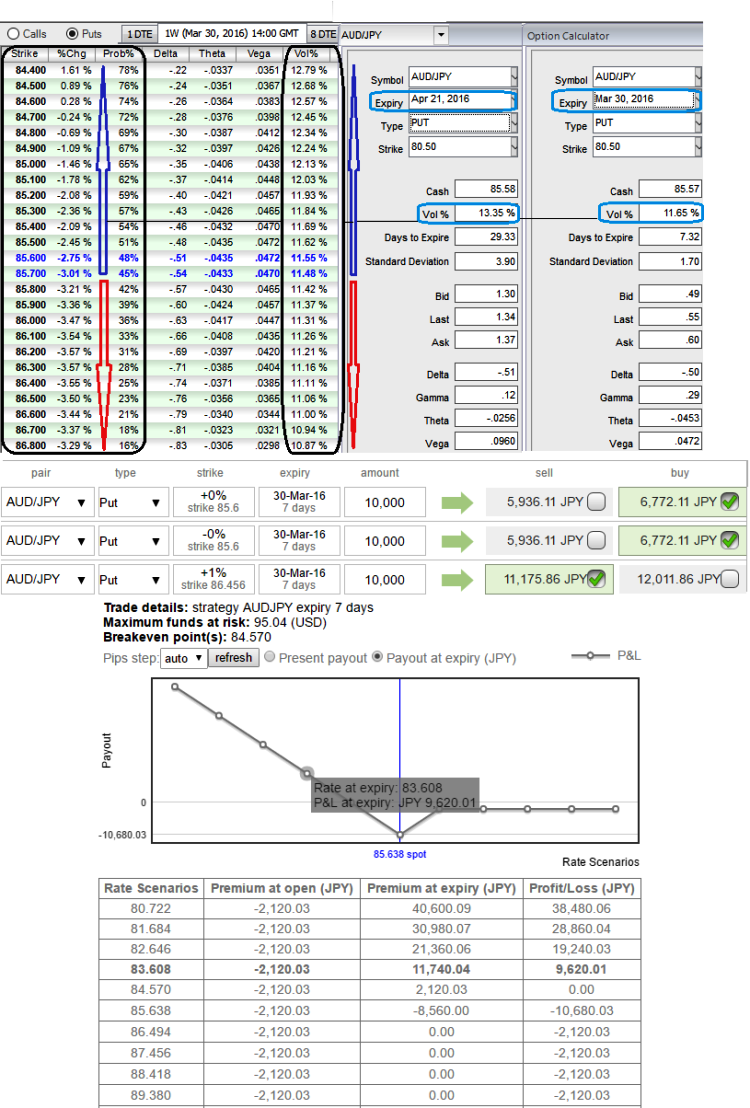
We begin with the reference of put options, hereinafter when we refer OTM or ATM strikes it is deemed as put options with OTM strike prices.
Well, the implied volatility of ATM contracts are spiking from 11.65% in 1w expiries to 13.35% in 1m expiries.
This has been in sync with OTM strikes and justified by historical volatilities (refer sensitivity table for different scenarios of option strikes, glance 6 levels above for vega 0.0438 at higher volatility of 12.13% and 6 levels below for vega 0.0420 at reduced vols at 11.21%).
This pair has been oscillating between 86 and 84 range.
Technically, buying momentum is reduced as it approaches upper bracket (86) but long term downtrend seems to be intact on convincing volumes along with massive dips and technical indicators favouring bears on monthly charts.
As we expect the underlying currency exchange rate of AUDJPY to make a larger move on the downside. As shown in the figure purchase 1M 2 lots of At-The-Money -0.52 delta puts and sell 1W one lot of (1%) In-The-Money put option with theta either closer to zero or positive .
Please be noted with extreme cautiousness that the probabilities of ATM puts expiring in the money are very higher but lower in case of higher striking put options (refer highlighted area for probability column).
So far we all know that the position uses long and short puts in the ratio, such as 2:1 or 3:2 and so on to maximize returns depending upon risk appetite and returns expectations.
Based on volatility and time decay, the strategy is a "price neutral" approach to options, and one that makes a lot of sense.
When it comes to payoff significance what if the strategy works out as per your analysis and what if doesn't, the above chart and table evidences the strategy's present or at expiration payout over a range of rate scenarios,
The delta ATM puts are likely to fetch exponential yields as the spot FX reaches 84 range or drifts even lower.