FxWirePro: NZD/USD remains soft as US bond bloodbath dominates
  GBP/JPY Pullback Deepens: Sell-on-Rallies Strategy Targets 207.00 Support
  FxWirePro- Major Crypto levels and bias summary
  Major Pair Currency Score: USDCAD and USDCHF Lead Bullish Momentum, While NZDUSD and AUDUSD Face Extreme Bearish Pressure
  FxWirePro: GBP/AUD firms slightly, but downward resumption looks likely
  FxWirePro- Woodies Pivot(Majors)
  FxWirePro: GBP/NZD steadies around 2.3350 , retains bid tone
  FxWirePro: AUD/USD pressured by rising treasury yields, risk-off mood
  AUDJPY Tumbles Below 111 on Widespread Australian Dollar Weakness; Key Resistance at 112 Holds Firm
  FxWirePro: GBP/USD gains some ground but bulls lack punch
  FxWirePro: GBP/AUD struggle to extend its recovery, good to sell on rally
  FxWirePro: EUR/AUD retreat from early gains, eyes another drop
  FxWirePro: USD/ZAR cedes early gains ,outlook bearish
  Extremely Bearish JPY Majors: GBPJPY, NZDJPY, AUDJPY Lead the Decline
  FxWirePro: USD/JPY loses momentum but outlook is bullish
  FxWirePro- Major Pair levels and bias summary


 Add as a preferred source on Google
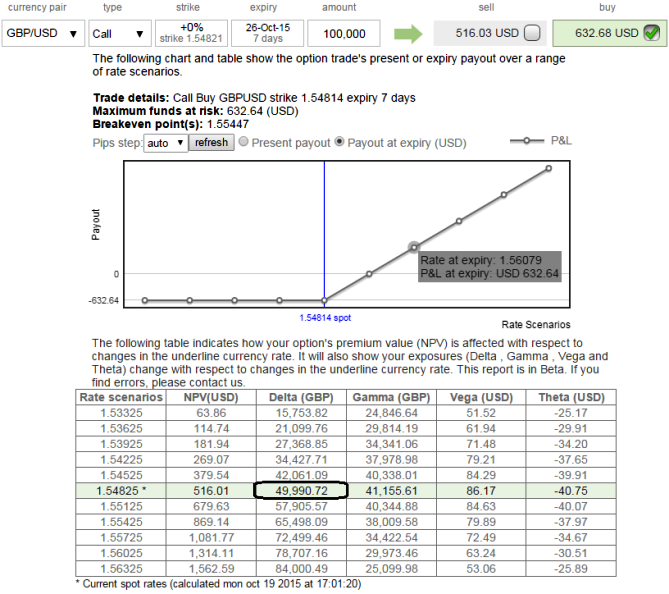
Let us ponder over the delta-hedged at-the-money call option. As shown in the figure, this GBPUSD call option has almost 50% delta (being at-the-money call), so we need to sell half as many lots of the underlying as we own call options in order to delta-hedge.
Let's also assume we hold 1.5500 calls and delta hedge this by selling 50% units of the spot. Finally, let us assume the call option has a gamma of 0.40. Now, suppose the spot price falls suddenly to $1.5450.
We know from the option gamma that for a $1 price change in the spot, the delta will change by about 10 cents. (In reality, the change is likely to be less than 10 because the gamma is not constant and typically in this case will be lower than 10 when the call option is not precisely at-the-money; but for now let us assume it is always 10).
So the spot price fall is accompanied by a fall in the delta of the call option to 40%. Here then we can see that our original delta-hedge is now too big; we sold 50% units of the spot, but now only need to be short 40, given the new call delta.
This implies we need to buy back 10% units of the spot and this is good news because the spot has just fallen in price by 50 pips. This demonstrates the basic idea of gamma hedging. It involves re-hedging an option portfolio due to the change in the portfolio delta, which in turn happens because the portfolio has gamma and the spot price has changed.
Note that if the underlying exchange price had risen instead of having fallen, this too would have been profitable. At 1.5550, the call has a delta (again, approximately) of 60%; in this case we are not short enough spot and need to sell more (because we are only short 50% of the spot).
This is good news because the spot has risen in price (and we now need to sell; in effect we are long the underlying when its price has risen). This shows the benefits of being long gamma; here we are long gamma because we owned the call option.

- News

- Economy

- Central Banks
- Investing
- Research
- Roundups
- Digital Currency
- Insights
- Technical Analysis
- Technology
- Business
- Law
- Health
- Nature
- Fintech
- Science
- Topic
- Opinions
- ©Econometrics LLC . All Rights Reserved.
FxWirePro: A briefing on cable’s delta-gamma hedging
Monday, October 19, 2015 12:39 PM UTC
Editor's Picks



- Market Data
Most Popular