


 FxWirePro- Woodies pivot (Major)
  Bitcoin Sheds $491M in ETF Outflows and Retreats Below $64K; Sellers Reload for $50K
  FxWirePro: EUR/AUD bullish outlook with scope to target 1.6550
  FxWirePro: USD/JPY dips as Japanese Yen consolidates near 40-year low
  FxWirePro:GBP/USD recovers slightly from early decline but bears are not done yet
  FxWirePro: USD/CAD hits 14-month high , Scope for further upside
  FxWirePro: NZD/USD extends losing run, eyes 0.5600 level
  FxWirePro- Major Pair levels and bias summary
  FxWirePro: GBP/AUD sustains gains as uptrend remains strong
  FxWirePro: AUD/USD drifts lower, uninspired by jobs beat
  ETH Bounces as Shorts Cover, Yet ETF Bleed Warns $1,850 Resistance Won’t Break
  FxWirePro- Woodies pivot (Major)
  FxWirePro : AUD/USD drifts lower, could be on verge of bigger drop
  BTC Slips Below $60K as Institutional Demand Dries Up — Bears Eye $59K Support, Rallies to $63K for Shorts
  FxWirePro: GBP/NZD gaining momentum for a move towards 2.3100 level
  AUDJPY Bears Take a Breather at 111.50, But ‘Sell on Rallies’ Still Eyes 110


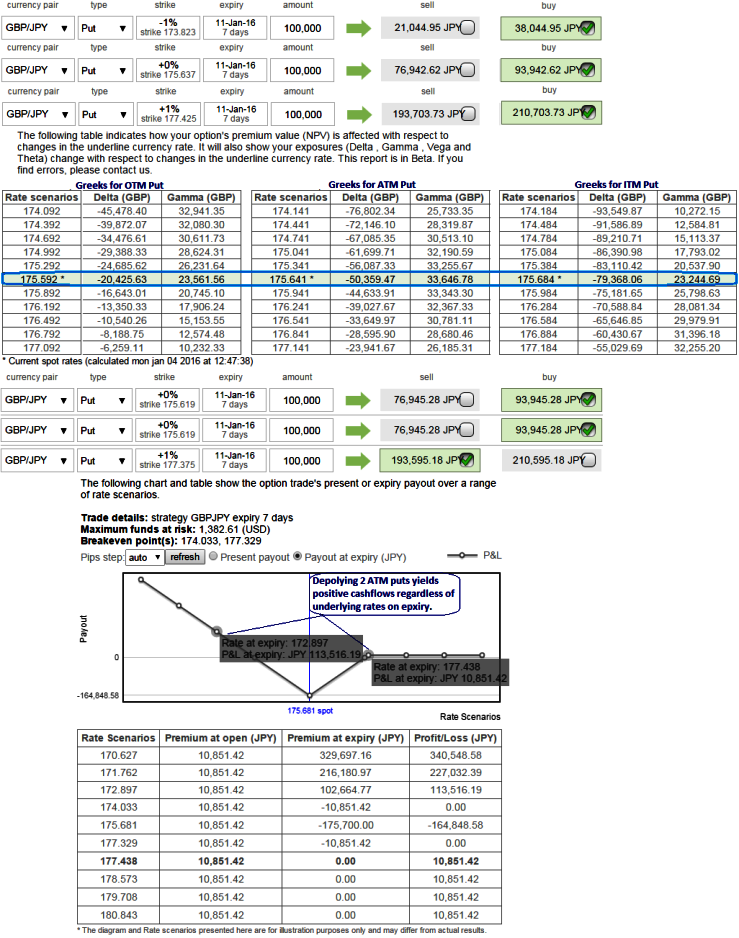
The New Year series for GBPJPY has been unpleasant as we traced out gap down opening at 177.084 with day intraday lows at 175.796.
Thereby, the pair has achieved our 1st targets at 177.125 and now our second target 175 is pretty much on the table.
So, these continued downswings may turn adversely as we think the current downtrend holds stronger in long run, so we've tailored our formulation of strategies as the risk appetite varies from different investors to different traders.
As shown in the diagrammatic representation, naked at the money put option with 7 days expiry has descent delta at 0.50 with when gamma was at around 0.33 but this is not the same case with other strikes even though we've chosen in the money strikes.
As shown in the sensitivity table, Gamma is responsible as to how much the Delta is supposed to change to the underlying rate moves by 1%.
Because in the sensitivity table gamma shows how much the delta will shift for a corresponding underlying rate moves by 1%.
The Gamma is useful when using the underlying market to hedge options, since it gives an idea of how much more or less you need to hedge in the underlying market if the market price moves by 1%.
A larger Gamma means the Delta is more sensitive to a change in the underlying market price, which means a larger risk or reward.
With reducing volatility gamma adds to the risk and reward profile for both holders and writers.
Thus, with hedging perspectives, using gamma factor in order to neutralize volatility factor, put back-spreads are advocated so as to reduce the sensitivity and focus on hedging motive.
Hence, go long on 1W 2 lots of at the money -0.50 delta puts with gamma at 0.33 and simultaneously shorting 3D Out-Of-The-Money put option is recommended to reduce the cost of hedging by financing long position in buying At-The-Money Puts.
Note: The identical expiries used in diagram is only for demonstrate purpose, use shorter maturities on short side.

- News

- Economy

- Central Banks
- Investing
- Research
- Roundups
- Digital Currency
- Insights
- Technical Analysis
- Technology
- Business
- Law
- Health
- Nature
- Fintech
- Science
- Topic
- Opinions
- ©Econometrics LLC . All Rights Reserved.
FxWirePro: GBP/JPY ATM gamma puts in back spreads to monitor hedging objectives
Monday, January 4, 2016 7:51 AM UTC
Editor's Picks


- Market Data
Most Popular


