


 NZDJPY's Downward Spiral: Will 92 Resistance Seal the Bearish Fate?
  FxWirePro- Major Crypto levels and bias summary
  FxWirePro:NZD/USD rout continues without relief
  FxWirePro- Major Pair levels and bias summary
  FxWirePro:GBP/USD recovers slightly from early decline but bears are not done yet
  FxWirePro: USD/ZAR slips as dollar weakens after PCE inflation data
  FxWirePro: AUD/USD drifts lower, uninspired by jobs beat
  GBPJPY Caught in a Tight Range: Bearish EMAs Suggest a Breakout Awaits
  FxWirePro: GBP/AUD edges higher but bullish outlook persists
  Bitcoin Sheds $491M in ETF Outflows and Retreats Below $64K; Sellers Reload for $50K
  ETH Bounces as Shorts Cover, Yet ETF Bleed Warns $1,850 Resistance Won’t Break
  NZDJPY Bears Reload as 92 Resistance Caps Bounce; Sell-on-Rallies Eyed Toward 90
  FxWirePro: NZD/USD extends losing run, eyes 0.5600 level
  FxWirePro: USD/CAD uptrend loses steam, remains on bullish path
  FxWirePro- Woodies pivot (Major)
  FxWirePro : AUD/USD drifts lower, could be on verge of bigger drop


 on HY vols optimizes hedging motives in robust downtrend - EconoTimes)


Aussie prints upbeat numbers in unemployment at 5.8% in Feb, reduced from previous 6%, whereas the jobless claims in U.K. remained unchanged.
While last recent NAB's business confidence survey in Australia remains at 3 that indicates economic health - businesses react quickly to market conditions, so we think prevailing economic conditions in Australia is on upper hand than U.K.
On the contrary, trade balance in U.K. has expanded from previous -9.9B to the current -10.3B in line with the forecasts.
With resultant effects, the GBPAUD cross is anticipated to depreciate further, most likely towards 1.83 levels.
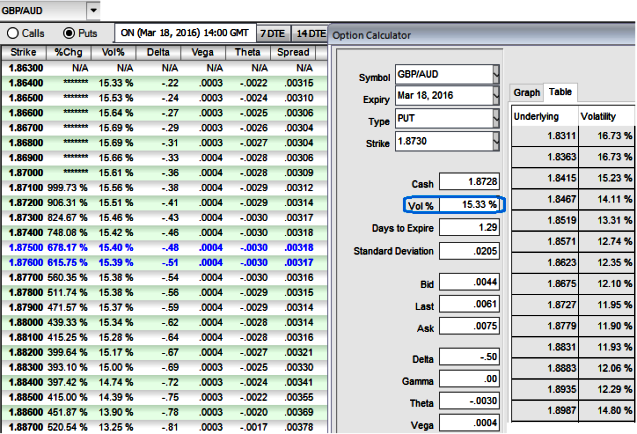
Approximately about three from now BoE's rate decision would be released which is likely to remain unchanged but the potential Brexit event keeps adding more pressures on sterling, but refer above diagram for 1D IVs in FX options due to the U.K's interest rate speculations.
The pair has been very well reacting as per earlier analysis and we maintain our medium term targets at 1.83 levels.
Since OTC markets seem to be highly volatile with extremely bearish environment, and IVs for 1M contracts are expected to fade away (at around 10.80%). This would be a good news for short term option writers contemplating the prevailing bearish environment but more number of longs in ATM delta puts would ensure the reasonable probabilities in underlying exposures.
To factor in the weakness in this pair as we could see reasonable IVs even in next 1-3m expiries, we recommend capitalizing more on bearish signals and the IV factor in long term by employing OTM longs matching with ATM longs to construct back spreads that likely to fetch positive cash flows.
Please be sure that a large move in the underlying should be allocated with longer tenor (targets set at 1.83 levels) and can be withstood without losing any money. This should be of greater concern than doing the spread for reducing debit.
So, here goes the strategy this way, Go long in 2 lots 1M ATM -0.50 delta puts, long in 2M (1%) OTM -0.35 delta put, and simultaneously short 2W (1%) ITM shorts, the spread is to be executed in the ratio of 3:1with net delta at around -0.70
The delta of the strategy is at 70%, which means there is more likelihood of expiring ITM, since we are certain about our research, we preferred 1 lots of extra long of slightly OTM strikes in our Put Ratio Back Spread.


