


 ETH Bounces as Shorts Cover, Yet ETF Bleed Warns $1,850 Resistance Won’t Break
  FxWirePro: GBP/AUD sustains gains as uptrend remains strong
  FxWirePro: USD/CAD uptrend loses steam, remains on bullish path
  NZDJPY: The Kiwi Yen's Bull Run Hits a Brick Wall at 92 — Sell the Rally?
  FxWirePro: GBP/NZD gaining momentum for a move towards 2.3100 level
  FxWirePro:NZD/USD rout continues without relief
  NZDJPY Bears Reload as 92 Resistance Caps Bounce; Sell-on-Rallies Eyed Toward 90
  AUDJPY Bears Take a Breather at 111.50, But ‘Sell on Rallies’ Still Eyes 110
  FxWirePro- Major Crypto levels and bias summary
  FxWirePro: GBP/AUD edges higher but bullish outlook persists
  FxWirePro: EUR/AUD bullish outlook with scope to target 1.6550
  FxWirePro- Woodies pivot (Major)
  Sterling Slump Sends GBPJPY Toward 212.60 — Bearish EMA Stack Eyes 210
  FxWirePro:GBP/USD recovers slightly from early decline but bears are not done yet
  BTC Slips Below $60K as Institutional Demand Dries Up — Bears Eye $59K Support, Rallies to $63K for Shorts
  FxWirePro- Major Pair levels and bias summary
  Bitcoin Sheds $491M in ETF Outflows and Retreats Below $64K; Sellers Reload for $50K


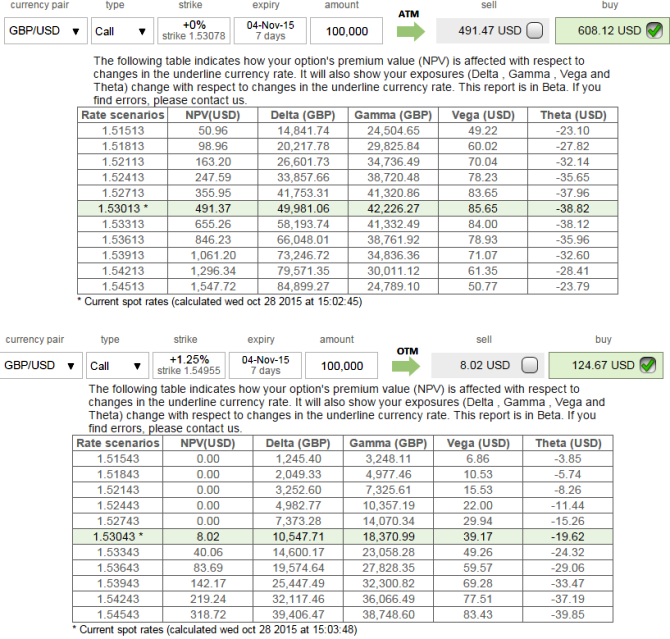
Let's contemplate the delta-hedged at the money call option, as shown in the figure, this GBPUSD call option has almost 50% delta (being at-the-money call), so we need to sell half as many lots of the underlying as we own call options in order to delta-hedge.
Let's also assume we hold 1.5500 OTM calls and delta hedge this by selling 50% units of the spot. Finally, let us assume the call option has a gamma of 0.42. Now, suppose the spot price falls suddenly below $1.5450.
We know from the option gamma that for a $1 price change in the spot, the delta will change by about 10 cents. (In reality, the change is likely to be less than 10 because the gamma is not constant and typically in this case will be lower than 10 when the call option is not precisely at-the-money; but for now let us assume it is always 10).
So the spot price 50 pips fall is accompanied by a fall in the delta of the call option to 40%. Here then we can see that our original delta-hedge is now too big; we sold 50% units of the spot, but now only need to be short 40, given the new call delta.
This implies we need to buy back 10% units of the spot and this is good news because the spot has just fallen in price by 50 pips. This demonstrates the basic idea of gamma hedging. It involves re-hedging an option portfolio due to the change in the portfolio delta, which in turn happens because the portfolio has gamma and the spot price has changed.
Note that if the underlying exchange price had risen instead of having fallen, this too would have been profitable. At 1.5550, the call has a delta (again, approximately) of 60%; in this case we are not short enough spot and need to sell more (because we are only short 50% of the spot).
This is good news because the spot has risen in price (and we now need to sell; in effect we are long the underlying when its price has risen). This shows the benefits of being long gamma; here we are long gamma because we owned the call option.

- News

- Economy

- Central Banks
- Investing
- Research
- Roundups
- Digital Currency
- Insights
- Technical Analysis
- Technology
- Business
- Law
- Health
- Nature
- Fintech
- Science
- Topic
- Opinions
- ©Econometrics LLC . All Rights Reserved.
FxWirePro: Delta gamma hedge of GBP/USD ATM Calls
Wednesday, October 28, 2015 9:47 AM UTC
Editor's Picks


- Market Data
Most Popular


