NZDJPY Plunges Below 90 Amidst Broad New Zealand Dollar Weakness; Resistance at 90.80 Key for Downside Continuation
  FxWirePro: NZD/USD remains soft as US bond bloodbath dominates
  FxWirePro: EUR/AUD firms slightly, but outlook remains bearish
  FxWirePro: EUR/AUD retreat from early gains, eyes another drop
  FxWirePro- Woodies Pivot(Majors)
  FxWirePro: GBP/AUD firms slightly, but downward resumption looks likely
  FxWirePro- Major Pair levels and bias summary
  FxWirePro: GBP/USD gains some ground but bulls lack punch
  FxWirePro: GBP/AUD struggle to extend its recovery, good to sell on rally
  Sell the Rally: Gold Eyeing $4,000 as Dollar Strength Takes Control
  FxWirePro: GBP/NZD steadies around 2.3350 , retains bid tone
  USD/CHF Bulls Eye 0.8400 Breakout as Broad Dollar Demand Drives 100-Pip Surge
  GBP/JPY Pullback Deepens: Sell-on-Rallies Strategy Targets 207.00 Support
  Extremely Bearish JPY Majors: GBPJPY, NZDJPY, AUDJPY Lead the Decline
  FxWirePro: USD/CAD hits two month high as Canadian as retail sales post monthly decline


 Add as a preferred source on Google
Technical glance: This APAC pair is most likely to retest resistance (at 83.495 region) on daily charts, we also consider this as whipshaw at this resistance level on EOD graphs as it's been hanging around that resistance quite a few times that signals bearish movements back again which is adverse to the previous rallies. With spot FX at 83.105 which is still 3.4% below 21DMA (86.0595), capitalizing on prevailing upswings and ATM IVs of 1W expiries almost at 21%, we construct below strategy to tackle this puzzling swings.
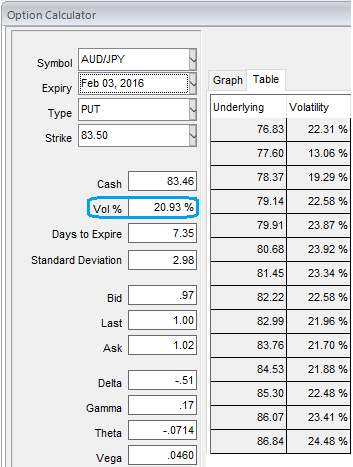
Speculators are inclined to perceive the put ratio back spread as a bearish strategy, because it employs more puts. However, it is actually a volatility strategy. The implied volatility of 1W ATM AUDJPY put contract is at 20.92% and it is quite higher side which is good sign for option writers.
We are cognizant of holding an option during higher IVs is most likely event of deriving positive cash flows. Please be noted that short-dated options are less sensitive to IV, while long-dated are more sensitive. Options with a higher IV cost more. This is intuitive due to the higher likelihood of the market 'swinging' in your favour.
As we expect the underlying currency exchange rate of AUDJPY to make a larger move on the downside in long run and some abrupt upswings in short run as well the opportunities remains on either side as we saw higher IVs.
Therefore, it is advisable to go long in 1M 2 lots of At-The-Money -0.51 delta puts and (0.5%) out of the money -0.16 delta put and simultaneously short 1W 1 lot of (1%) In-The-Money put option as the pair is likely to show some minor upswings in next a day or two.
Arriving into this AUDJPY PRBS position which has higher implied volatility at 21% and supposing for the inevitable adjustment is a smart approach, regardless of the direction of price movement.
Based on volatility and time decay, the strategy is a "price neutral" approach to options, and one that makes a lot of sense.
So far we all know that the position uses long and short puts in the ratio, such as 2:1 or 3:2 and so on to maximize returns depending upon risk appetite and returns expectations.
In most long/short spreads, you make money if the underlying price moves, but you lose if it remains in the middle loss zone. Now with increased volatility option shorter can get benefitted from this.
A ratio put back spread is different because it reduces a net debit, so even if the underlying price does not move very much, you keep the credit if all of the puts expire worthless.

- News

- Economy

- Central Banks
- Investing
- Research
- Roundups
- Digital Currency
- Insights
- Technical Analysis
- Technology
- Business
- Law
- Health
- Nature
- Fintech
- Science
- Topic
- Opinions
- ©Econometrics LLC . All Rights Reserved.
FxWirePro: ITM shorts in AUD/JPY put ratio back spreads to beat higher IV
Wednesday, January 27, 2016 6:47 AM UTC
Editor's Picks



- Market Data
Most Popular