AUDJPY Weakness Deepens: Sell Rallies Toward 112 as Aussie Dollar Falters
  FxWirePro- Major Pair levels and bias summary
  FxWirePro: NZD/USD neutral in the near-term, scope for downward resumption
  FxWirePro: GBP/NZD maintains bersish bias with focus on 2.2900 level
  NZD/JPY Flatlines Near 94.60: Will Key Support Reignite the Uptrend?
  EUR/JPY Holds Bullish Bias as Euro Extends Recovery
  FxWirePro: GBP/USD edges higher as traders await BoE guidance and UK fiscal clarity
  Major Forex Pairs Action Bias: GBPUSD and AUDUSD Turn Extremely Bearish
  FxWirePro: USD/ZAR retreats but trend is still bullish
  FxWirePro: USD/CAD slips after Fed holds rates steady
  FxWirePro- Woodies pivot (Major)
  FxWirePro: USD/JPY eases ahead of Fed decision , Intervention risks linger
  EUR/USD Bounces from Monthly Low, But Bearish Pressure Remains
  FxWirePro- Major Pair levels and bias summary


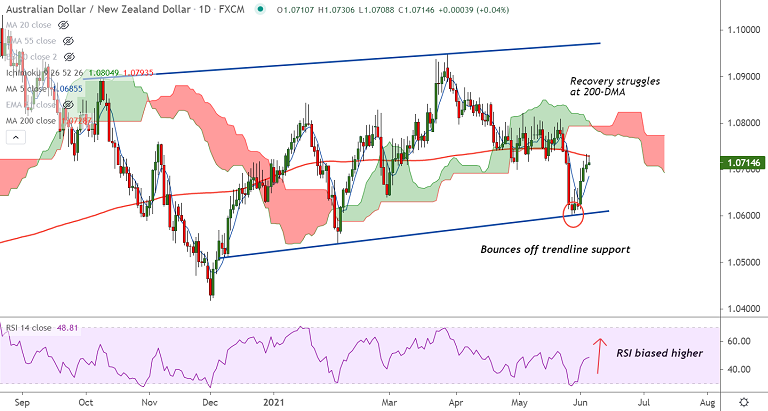
AUD/NZD chart - Trading View
AUD/NZD was trading 0.04% higher on the day at 1.0715 at around 08:00 GMT.
The pair is extending gains for the 6th straight session, but long upper wicks on daily candles suggests some selling pressure at highs.
Price action has bounced off channel base support, the pair has recovered most of last week's losses.
The pair is trading 0.83% higher for the week, but recovery attempts are finding stiff resistance at 200-DMA and 21W EMA.
Bullish MACD line crossover on signal line raises scope for upside. 5-DMA also is now biased higher.
Stochs and RSI have rolled over from oversold territory. Decisive break above 200-DMA will fuel further upside.
Support levels - 1.07, 1.0685 (5-DMA), 1.0671 (200H MA)
Resistance levels - 1.0728 (200-DMA), 1.0740 (110-EMA), 1.0793 (Cloud base)
Summary: AUD/NZD has paused recovery at 200-DMA, decisive break above required for further upside. Next hurdle for bulls aligns at daily cloud. Rejection at 200-DMA negates any bullish bias.