FxWirePro: NZD/USD drifts lower as markets await US inflation data
  AUDJPY Holds Firm Above 112 on Broad Yen Weakness: Buy Dips Toward 115
  Major Pair Currency Score: GBPUSD and AUDUSD Extremely Bullish at 100, USDCAD Extremely Bearish at -100 – Key Major Levels to Watch
  FxWirePro:EUR/NZD gains slightly as ranges remain tight ahead U.S. inflation report
  FxWirePro: EUR/NZD neutral in the near-term, scope for downward resumption
  FxWirePro: USD/CNY hovers near 3-1/2-year low ahead of U.S. data
  Major Pair Currency Score: GBPUSD and AUDUSD Extremely Bullish, NZDUSD Bullish
  FxWirePro: USD/CAD hits two-month low as oil prices rise
  FxWirePro: GBP/AUD risks tilt further to the downside
  FxWirePro: USD/ZAR edges higher after weak SA jobs and manufacturing data
  FxWirePro: GBP/USD trades sideways as markets await U.S. inflation and UK GDP data
  JPY Currency Scoreboard: USDJPY and NZDJPY Emerge as Top Bullish Pairs to Watch
  FxWirePro: AUD/USD range bound ahead of RBA policy decision
  FxWirePro- Woodies pivot (Major)
  NZDJPY Bullish at 365-EMA Support: Buy Dips Toward 95 Target
  FxWirePro- Major Pair levels and bias summary


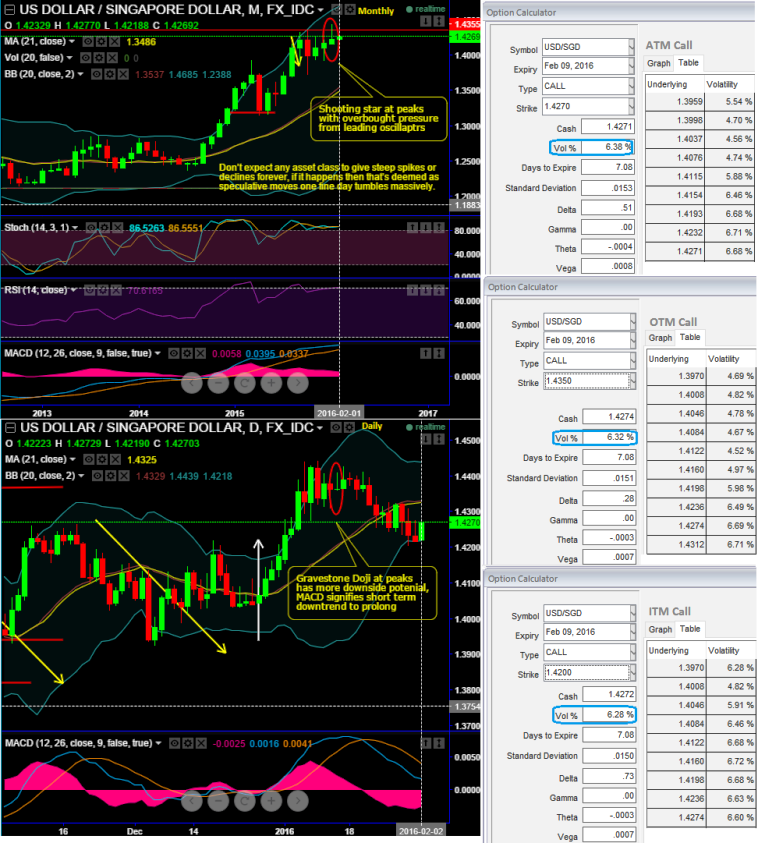
Singapore dollar after continues losing streak from last 3 months, it seems like making an attempt of recovery as a shooting star is spotted out at peaks, since daily stochastic is showing buying interest it is advisable to capitalize on these rallies for better entry points to stay short.
Leading indicators on monthly charts suggest prevailing price recoveries of SGD to sustain further and likely to evidence further dips in near future. RSI on weekly is beautifully converging to the price bounces right from below 30 levels.
Both RSI and stochastic oscillators are signaling indecision in overbought zones.
While an attempt of %D crossover of slow stochastic curve above 80 levels which is bought territory also suggest selling pressure are strengthened. To substantiate this bearish view we've seen recent price declines on daily charts that has slid below 21DMA.
Although you may likely to see some price spikes in a day or two, we would anticipate more dips in the weeks to come. As a result, we come up with suitable currency strategic framework so as to match this trend swinging for slight downside risks. With current USDSGD spot FX is ticking at 1.4270, place call ratio spread with 1:2 ratios.
How to execute: Buy ATM 0.5 delta call with longer expiry (let's say 1m tenor). Sell two lots of call options, one 4D OTM strike calls (0.5% strikes) with positive theta and delta closer to zero, after squaring off this positon go long in 4D ITM call (0.5% strikes) with positive theta and delta closer to zero.
Thereby, the strategy matches the puzzling abrupt rallies and certain short term declines so as to suit the corrective slumps and to take the advantage of overpriced calls by shorting.
While, the delta value becomes more and more insensitive as the USDSGD falls lower and lower and hence on the lower side, the delta value is zero.
Why call ratio spread: As the pair has made steep slumps and healthy recovery we see a neutral to bearish environment when you are projecting decreasing volatility (see from next 1 month to 3 month it's been gradually reducing).
Risk/Reward Profile: The risk is unlimited. The reward is the difference in the strike prices plus the net credit, multiplied by the number of long contracts.

- News

- Economy

- Central Banks
- Investing
- Research
- Roundups
- Digital Currency
- Insights
- Technical Analysis
- Technology
- Business
- Law
- Health
- Nature
- Fintech
- Science
- Topic
- Opinions
- ©Econometrics LLC . All Rights Reserved.
FxWirePro: USD/SGD shooting star signals more speculative dips on the cards – 1:2 call ratio spreads best suitable
Tuesday, February 2, 2016 1:18 PM UTC
Editor's Picks



- Market Data
Most Popular