


 ETH Bounces as Shorts Cover, Yet ETF Bleed Warns $1,850 Resistance Won’t Break
  NZDJPY's Downward Spiral: Will 92 Resistance Seal the Bearish Fate?
  AUDJPY Under Pressure: US Dollar Strength and Bearish Technicals Signal Further Declines
  FxWirePro: GBP/USD neutral in the near-term, scope for downward resumption
  FxWirePro- Woodies pivot (Major)
  FxWirePro: USD/CAD loses momentum but bullish setup remains
  FxWirePro- Major Crypto levels and bias summary
  Bitcoin Sheds $491M in ETF Outflows and Retreats Below $64K; Sellers Reload for $50K
  FxWirePro- Major Crypto levels and bias summary
  FxWirePro: USD/ZAR slips as dollar weakens after PCE inflation data
  FxWirePro: EUR/AUD up trend gains momentum but hurdles ahead
  FxWirePro: EUR/ NZD gaining momentum for a move towards 2.0350 level
  FxWirePro: NZD/USD extends losing run, eyes 0.5600 level
  EURJPY Consolidates Above Key EMAs: Mixed Indicators Suggest Cautious Optimism for Traders
  FxWirePro : AUD/USD drifts lower, could be on verge of bigger drop
  FxWirePro: USD/ZAR retreats slightly but trend is still bullish
  EURUSD Bullish Momentum: Trading Above 800, 365 EMAs with Positive CCI on 5-Min Chart


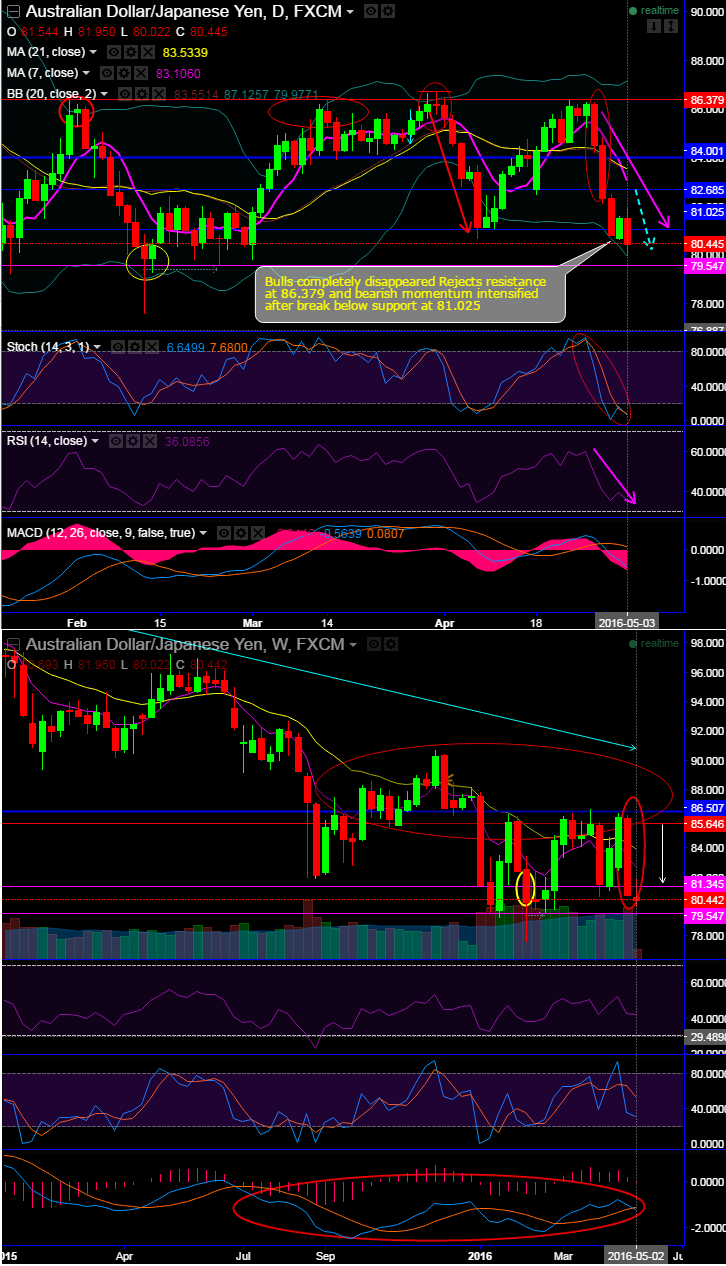
Congratulations to all our readers on this winning trade..!!!, 82.456 as well as 81.025 are very well achieved.
Before we begin, let's just refer below link for our previous write up on the trend prediction:
Still no strength in this pair, more bearish bearish rout on the table as it breaks important support 81.025 as well.
No signs of recovery RSI and Stochastic leading oscillators.
7DMA crosses below 21DMA again, while MACD shows bearish convergence at zeros on daily and remains below zero on weekly.
A resembling bearish engulfing pattern on weekly signifies serious weakness in this pair.
So, how to arrest these bearish risks:
ATM IVs of AUDJPY of 1M tenors is at around 16.81%.
Sensitivity tool signals more positive change in premiums in OTM strikes scenarios.
Thereby, one can initiate trading or hedging strategy using OTM puts which would be even more cheaper.
On hedging grounds, Put ratio Back Spreads are advocated to arrest these downside risks.
Because, the trend signaling bearish risks especially after breaking major supports at 84.001, 82.685 and now 81.025 levels with encouraging bearish signals by technical indicators also as explained in previous technical write up and those stances likely to prolong, and secondly, the traders tend to view the put ratio back spread as a bear strategy, because it employs puts. However, it is actually a volatility strategy.
Options with a higher IV cost more. This is intuitive due to the higher likelihood of the market 'swinging' in your favour. If IV increases and you are holding an option, this is good. You should also note short-dated options are less sensitive to IV, while long-dated are more sensitive.
As we expect the underlying currency exchange rate of AUDJPY to make a larger move on the downside. As shown in the figure purchase 1M 1 lot of at the money -0.49 delta put, 1 lot of 2M (1%) out of the money -0.37 delta put and sell 1W one lot of (0.5%) In-The-Money put option.


